
In this post, we will focus mainly on branching and merging techniques in Git. They are very powerful features in Git. For example, there is a master branch that we are working on it and suddenly we get an idea of a new feature that we want to add but we are not sure if the new feature will work out or not. Now instead of making changes and commits to our master branch and then trying to redo if there is an issue, Git allows us to create a new branch which can be used to add our new feature. We can switch back and forth between master and newly created branch. If the idea doesn’t work out, we can throw away the newly added branch without affecting the master branch and if the idea does work out then Git allows to add changes to the master branch through a process called merging.
Here also we will use our Hybrid Framework project to learn the branching and merging techniques.
Create a new branch
-
- Open the Terminal and navigate to Project folder and then do a
git status. Our Master branch will be clean and there will be nothing to commit as displayed below.
git status - Type in
git branchto view all the available branches. Currently, we have only one branch and that is the master branch. Notice the * placed near to Master. This means the head is pointing currently to Master branch.
git branch - To create a new branch, type in
git branch newframeworkand hit return. To make sure that new branch named ‘newframework’ is created or not, usegit branchcommand to view all branches. Notice that the * is still placed near to Master. This means the head is still pointing to Master branch as the Master code is checked out.
New Branch ls -la .git/refs/headswill list out all the heads available.cat .git/refs/heads/newframeworkwill display the hash value of our last commit in ‘newframework’ branch. Notice that this is exactly same as the last commit of our Master branch. Only when we start doing new commits to the new branch the values starts changing.
Heads - As mentioned in the previous step, currently Master branch is checked out. To checkout ‘newframework’ branch, type in
git checkout newframework. We can confirm which branch is checked out by typing ingit branch. Usingcat .git/HEADcommand, we can confirm to which branch HEAD is pointing to. Notice that * is now placed near to ‘newframework’ branch.
Branch checkout - Now let’s do some changes in our Hybrid Framework project and commit the changes to the new branch ‘newframework’. We will edit the readme file and add few more details as displayed below and then save it.

Changes done to readme file - To commit the changes in ‘newframework’ branch, first, do
git statusto confirm on the changes and then do a force commit using the commandgit commit -am "Updated read me file in newframework branch". Notice that the updated readme.txt file is committed in ‘newframework’ branch and not to master branch.
Committing to new branch - Using command
git log --onelinewe can get the log of commits done in ‘newframework’ branch. Notice that the HEAD is pointing to ‘newframework’ branch and also new hash value is created for the new commit.
git log of newframework branch - To verify that the new changes are not committed to Master branch, use
git checkout mastercommand to checkout the Master branch. Usegit branchto confirm the checkout.
Checkout master branch - Once Master branch is checked out, we can open the readme file in our Hybrid Framework project to verify if we have the updated readme file or not. Notice that we no longer have the updated readme file as the current branch is Master.

readme file from Master branch - To switch back to the new ‘newframework’ branch, type in
git checkout newframework. This will checkout the ‘newframework’ branch and we can see the updated readme in eclipse.
Switched to newframework branch - One point to remember while switching branches is that we need to commit all changes made to existing files in the current branch before switching to another branch. Otherwise, Git will abort the process as there is data loss. However, if are adding new files in the current branch and then try switching to a different branch, Git will allow us to switch as there is no data loss happening.
- There are some additional commands that can be used while creating branches.
// Create a new branch and checkout at same time
git checkout -b new_branch_name

// Get more detailed log information when using multiple branches
git log --graph --oneline --decorate --all

// Compare two different branches
git diff master..newframework

// Find out whether one branch completely contains another branch or not
git branch --merged

// Renaming a branch
git branch -m newframework updatedframework

// Delete a branch. Notice that Git will not delete the current branch
git branch -d updatedframework

// Forcefully Delete a branch. This is used when to be deleted branch has recent commits
git branch -D updatedframework
- Open the Terminal and navigate to Project folder and then do a
Merge branches
- Now we decide that newly added functionality for which we created a new branch is working perfectly and we want to bring the changes to original branch so that they are the part of main project. Well, in order to do that we will use merging technique. In our case whatever changes that we did in ‘newframework’ branch will be merged to Master branch.
- We can view the differences by using
git diff master..newframeworkcommand. Notice the difference between two readme files found in master and ‘newframework’ branch.
git diff between master and newframework branch - The first step is that we want to make sure that we checkout the branch that things are being merged into. In our case, the master branch is going to the receive the changes from ‘newframework’ branch. In other words, we will checkout the master branch. Use
git checkout mastercommand to checkout the master branch. - To merge use
git merge newframework. Here ‘newframework’ is target folder and master is the receiving folder. Once merging is complete, we can verify the same in Eclipse. The readme.txt in master branch is exactly same as ‘newframework’ branch. Notice that the latest SHA value in master branch matches to that in ‘newframework’ branch.
git merge newframework - The above merging process is called Fast-Forward merge. This is because when we merged ‘newframework’ branch to master branch, there were no changes made to master branch after the creation of ‘newframework’ branch. As a result no new commits are made in master branch, instead, Git just fast-forward the last commit from ‘newframework’ branch to master branch and move HEAD along with it. Now of we do
git log --onelinein master branch, we can see that the Hash or SHA value is same as that in ‘newframework’ branch as displayed in above image. - If we don’t want Fast-Forward merge in the above case, we can force Git to make a no Fast-Forward merge using the command
git merge --no-ff newframework. This process will create a new commit in the master branch instead of doing the Fast-Forward merge. Similarly, we can also force Git to always do Fast-Forward merge only using the commandgit merge --ff-only newframework. Notice that this command will work only we can do a Fast-Forward, otherwise, it will abort. - If there is a commit on the master branch then its no longer a Fast-Forward merge as the HEAD moved to a new commit that’s not in the other branch. To simulate this merge, we will checkout a new branch ‘recursivebranch’ and add a new commit. Similarly, we add a new commit to master also. Although there is a common ancestor in both branches, the HEAD is pointing to a new commit in master which is not there in ‘recursivebranch’.

New commit in master branch - To merge ‘recursivebranch’ into master master, we will use
git merge recursivebranchcommand. As mentioned earlier, we need to be in the master branch. As soon as we hit enter, Git popped up a Nono editor asking us to enter a commit message. Nano editor gets opened because in .gitconfig file, default editor is set as Nano editor. We will just save with the default message ‘Merge branch ‘recursivebranch”. All of the other lines are going to be ignored and left out of the commit message.
Commit message in Nano editor - As soon as we Save and Close the Nano editor, below message, will be displayed.

Recursive strategy - Git has different merging strategies and Recursive is one of them. Now if we do a
git log --onelinein both branches, we can see a new commit is done into master branch. It may seem that there is a conflict happening as there are different commits to two different branches but Git is able to successfully handle the merge as it understands that the commit made to master is the latest one. Notice that the SHA value from ‘recursivebranch’ is saved before the last commit in master branch as Git is pretty good at figuring out on how to merge things in.
Git log - Sometimes when there are two changes to same line or set of lines in two different commits, Git doesn’t know which one to use or how to merge them together and we get a merge conflict.
- To create a merge conflict scenario, let create and a new branch ‘mergebranch’ using
git checkout -b mergebranch. In this branch, we will update the readme.txt file by deleting some comments and then updating few comments as shown below. Commit the changes to the new branch and then checkout master branch.
Updated comments in readme.txt file for ‘mergebranch’ branch - In master branch, we will not remove any comments instead just a small update to the existing one as displayed below. Commit the changes into the master branch.

readme.txt file update in master - Now when we try to merge the ‘mergebranch’ into master branch, we get below merge conflict message from Git. This is because Git is not sure which of the lines it need to prefer from readme.txt file. This is where Git requires our intervention.

Merge conflict - Now if we open our readme.txt file in eclipse, Git will mark the areas where ever it is finding conflicts. Notice that it will mention which all content belong to HEAD, that is the master branch and which all belongs to ‘mergebranch’ with a bunch of equal signs between them. Now its up to us to go through and decide which block of lines that we require to be committed to master branch.

Merge conflict displayed in readme.txt file - When we do a
git status, we will notice that the merge is not successful and Git wants us to resolve the conflicts in order to complete the merge. We have three choices to resolve merge conflicts and they are to abort, to resolve manually, or to use merge tools. Here we will not take the third approach. - To abort a merge, type in
git merge --abortcommand to abort the merge. This will simply abort the merging process and everything will go back to the state before the merge process. - Another way is to go to readme.txt and manually do the changes. Here we will confirm which block of lines to use and remove the references to HEAD, ‘mergebranch’ and equal signs. Notice that Git will mark the document where ever it is finding conflicts, so the best approach is to scan the entire document which has a conflict.

Manually resolving merge conflict in readme.txt file - Once we are satisfied with changes, we need to save and close it. We can do
git add readme.txtto add the file into staging. And we are ready to commit, we can directly usegit commitwithout any message. Git has a default message for commit during the merge process. We can remove conflict comment and save the default comment.
git commit for merge - To confirm if the merge is successful or not, we can do
git statusand then compare logs from both branches as displayed below. Notice that master branch has the last commit from ‘mergebranch’.
git log –oneline -3 to display first three commits
Additional Information:
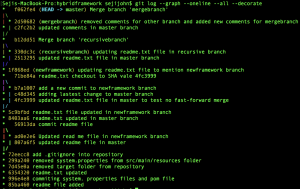
This is one command in Git using which we can get a graphical representation of all branching and merge that we did. Use the command git log --graph --oneline --all --decorate.
With this, we came to an end on few important features of Git. Keep following the blog and hope you were able to follow most of it. Until next post, Happy Learning!
More good information on Git!
Thanks