So far we learned about identifying and interacting with a single element in web page. What if we need to interact with multiple elements in a web page? Let’s modify our first test case and create a new one where we will interact with multiple web elements:
Second Test Case:
Navigate to “Google” website using Chrome Browser. Find the Search Web Element, enter a text “Selenium” and then do a search. Click on the second link which contains the text ‘Wikipedia’ and then verify the title of the web page displayed.
As you see that our requirement got changed. We need to click on the second link having with the text ‘Wikipedia’. So how do we overcome this problem?
One of the solution to this problem is to get a list of web elements using the ‘Partial Link Text‘ locator and store the elements in a List. From the List (Collections in JAVA), get the correct web element and then click on it to navigate to the required web page. Now let’s see how we can create a script in Selenium for our second test case.
package com.selenium.firstscript;
import java.util.List;
import org.openqa.selenium.By;
import org.openqa.selenium.WebDriver;
import org.openqa.selenium.WebElement;
import org.openqa.selenium.firefox.FirefoxDriver;
public class FifthScript {
public static void main(String[] args) throws InterruptedException {
// Setting System properties
System.setProperty("webdriver.gecko.driver",
System.getProperty("user.dir") + "/Firefox/geckodriver");
// Initialize WebDriver
WebDriver driver = new FirefoxDriver();
// Navigate to Google Website
driver.get("http://www.google.com");
//Maximize browser window
driver.manage().window().maximize();
//Relative XPath for the text box
driver.findElement(By.xpath("//input[@id='lst-ib']")).sendKeys("selenium");
//Find the Web Element Search icon. After finding, click the search icon
driver.findElement(By.id("_fZl")).click();
//Wait for page to load. Thread.sleep() throws InterruptedException
Thread.sleep(3000);
//Locate all elements that contains the text Wikipedia and store them to a List
List listSelenium = driver.findElements(By.partialLinkText("Wikipedia"));
//verify the size of the List to confirm if the size is greater than 0
System.out.println("Size of listSelenium: "+listSelenium.size());
/*Now to get the second element from the List and click on it. Notice the index is 1 as the elements in a List starts with 0 index*/
listSelenium.get(1).click();
//Store the title in a variable
String title = driver.getTitle();
//Title verification. The third link is Wikipedia link
if (title.equals("Selenium (software) - Wikipedia")){
System.out.println("TITLE VERIFIED.");System.out.println("TEST CASE PASSED");
}
else
System.out.println("TITLE NOT VERIFIED.");
//Close and quit the driver to close the Browser
driver.close();
driver.quit();
}
}
Since we are expecting more than one elements to be returned, we have to use findElements in stead of findElement as displayed below.
//Locate all elements that starts with the text Selenium and store it in a List
List listSelenium = driver.findElements(By.partialLinkText("Wikipedia"));
The above code runs successfully in Eclipse and you can verify the results in the console.
Eclipse console output
With this we came to end on one of the biggest topics in Selenium testing. Keep on reading and I will update soon with new interesting topics. Till then, Happy Learning!
This is one of the biggest topic in Selenium Automation. Selenium Automation scripts executes by identifying the correct elements or objects (like textboxes, buttons, dropdowns etc.) in a web page and then by performing actions (like click, enter etc.) to them. If you are able to identify the elements preciously in a web page then your scripts becomes dependable and when executed they will be able to identify any changes to the captured elements.
There are numerous ways to identify the elements correctly. Not one method is better than the other as all these methods helps us in identifying the correct element.
Locating By ID:
Most of the elements in a web page have IDs but its always not necessary. Using IDs we can easily identify the elements in the web page as they are supposed to be unique.
If you refer to our last automation script that we created, there is a set of code that we used to identify the text box and search icon in Google website.
/*Find the Web Element Search Text Box. After finding the Web Element, enter the word "selenium"into the text box*/
driver.findElement(By.id("lst-ib")).sendKeys("selenium");

//Find the Web Element Search icon. After finding, click the search icon driver.findElement(By.id("_fZl")).click();
While referring to the above code you can see that we have used the text box ID as “lst-ib” and search icon ID as “_fZl” to identify the text box and search icon in the Google webpage.
While script creation, you can open the web page in any of the browsers and right click on the element and select ‘Inspect Element’. This will allow you to view the HTML code. From here you can get the ID attribute of the element. as mentioned its not necessary for the ID to be available. If its not there, then we have to look for other methods to identify the element.
ID = “lst-ib”
Locating By Name:
Like the ID attribute, name attribute can also be used for element identification. Names are unique most of the times, but it’s not always necessary. If not unique then it will identify the first element with the name attribute. Name locators are good to use for Forms having uniques name attributes.
//Code Sample for name locator
driver.findElement(By.name("q"));
Here for the Google text box, instead of ID, we can also use name attribute for element identification. The code will successfully identify the text box only if there is one name attribute with value ‘q‘.
Locating By Class Name:
You can locate a web element using class name also. Like the IDs, class name is also an attribute that can be present inside different html tags. Like in the above screenshot for the Google text box, there is an attribute class=”gsfi” also present along with ID and name attributes. We can use the below code sample to identify web elements using class names.
//Code Sample for name locator
driver.findElement(By.className("gsfi"));
The only problem with class names is that they are not unique like IDs. Same class names can be used for multiple web elements as a result it very hard to locate a web element using class names only.
Locating By Link Text:
Link Text locators are applicable to hyperlink texts. Its used to locate the text inside anchor tags in html. Like in our last script, after clicking the search icon, Google displays list of website links. Our scripts searches for the link which has a text “Selenium – Web Browser Automation”. Of course it finds the link and clicks on it but how did it identify?
Link Text “Selenium – Web Browser A…”
We can use the below code sample to identify web elements using Link Text.
//Find the first link displayed using the link text and click the link
driver.findElement(By.linkText("Selenium - Web Browser Automation")).click();
Link Text is best to identify the hyperlinks in web page.
Locating By Partial Link Text:
Partial Link Text is almost same as Link Text. The only difference is that you don’t have to mention complete text in order to find the hyperlink. You can just mention partial text. However you need to make sure that the partial text is unique otherwise it will locate the first element from the list. We can use the below code sample to identify web elements using Link Text.
//Find the first link displayed using the link text and click the link
driver.findElement(By.partialLinkText("Selenium - ")).click();
Locating By Tag Name:
Tag Name can also be used in identifying the web elements. However finding web elements using Tag Names aren’t much popular as there are better methods to identify the elements. Like for example if the web page has only one drop down, you can use the Tag Name to locate the html tag “select”. We can use the below code sample to identify web elements using Tag Name.
//Find the first link displayed using the link text and click the link
driver.findElement(By.tagName("select"));
Locating By CSS Selector:
CSS Selector is one of the faster ways to identify a web element. There are different ways by which we can use the the CSS Selectors to locate a web element. Lets take multiple instances of Google text box. We will use CSS Selector in multiple ways to locate the text box. Refer the screenshot for easy understanding.
input tag of Google text box
Using ID only:
//css selectors using ID
driver.findElement(By.cssSelector("input#lst-ib")).sendKeys("selenium");
Please note for ID attribute we need to use ‘#’
Using Class Name only:
//css selectors using class name
driver.findElement(By.cssSelector("input.gsfi")).sendKeys("selenium");
Please note for class name attribute we need to use ‘.’
Using any one of the attributes:
//css selectors using name attribute
driver.findElement(By.cssSelector("input[name='q']")).sendKeys("selenium");
Please note that for any attributes we can use the above code in the format “element_name[<attribute_name>=‘value’]”. Like the name attribute there are other attributes present in the ‘input‘ tag which we can use to find the text box.
Using more that one attribute:
//css selectors using more than one attributes
driver.findElement(By.cssSelector("input[name='q'][role='combobox']")).sendKeys("selenium");
Please note if we need to use more than one attributes to identify a web element, we can use the above code in the format “element_name[<attribute_name>=‘value’][<attribute_name>=‘value’]”.
If we need to access to an element inside the unordered list (inside the ul tag), we can use the following example.
Selenium web site with tabs under unordered list (ul)
We can identify any of the listed item (li tag) inside the unordered list (ul) using the “nth-of-type” in the CSS Selector.
//css selector for clicking the first listed item in unordered list
driver.findElement(By.cssSelector("ul li:nth-of-type(1)")).click();
Using css selectors for random attributes:
Sometimes attributes like IDs are not constant. They keep on changing with every session. Like the case of below screenshot where you can notice the value of ID is a combination of alphanumerical. Sometimes the numerical value changes with each session. In that case we can consider only partial value of an attribute.
IDs are not constant
For random attributes, we can use different ways like ‘starts with’, ‘ends with’, ‘contains’ in the CSS Selector to identify the web element. Let’s assume the attribute values of the ‘Sign in’ button in the above screenshot keeps changing with every new session. We will use different methods to identify the ‘Sign in’ button.
//css selector where id starts with 'uh-sign'
driver.findElement(By.cssSelector("a[id^='uh-sign']")).click();
Please note we have to use ‘^=‘ for attributes ‘start with’
//css selector where id ends with 'signin'
driver.findElement(By.cssSelector("a[id$='id$='signin']")).click();
Please note we have to use ‘$=‘ for attributes ‘ends with’
//css selector where id has sub string or contains 'h-sign'
driver.findElement(By.cssSelector("a[id*='h-sign']")).click();
Please note we have to use ‘*=‘ for attributes ‘sub string’
Above were the most commonly used CSS Selectors, however you can still play around with CSS Selectors for identifying the elements. Please visit the below URL for more information:
XPath locator is one of the most used locators for finding elements in a web page. XPath is defined as XML Path and it locates an element by traversing between various elements across the entire page and thus finding the desired element with reference to another elements. There are many free plugins available for the browsers using which we can get an XPath of an element. ‘Firebug’ and ‘Firepath’ are most commonly used add ons for Firefox browser and ‘XPath Helper’ for Chrome browser. Here I will be using the add ons from Firefox browser to view the XPath.
There are two types of XPaths:
Absolute XPath:
Absolute XPath begins from the root path with a single forward slash(/) and followed by complete path of the web element. For example in Google web page, the Absolute XPath for the text box is ‘html/body/div/div[3]/form/div[2]/div[2]/div[1]/div[1]/div[3]/div/div/div[3]/div/input[1]’
FirePath add-on in Firefox browser
As you see Absolute XPath is the complete path starting from the root of the web page to the actual element. The code for Absolute XPath will be:
//Absolute XPath for the text box
driver.findElement(By.xpath("/html/body/div/div[3]/form/div[2]/div[2]/div[1]/div[1]/div[3]/div/div/div[3]/div/input[1]")).sendKeys("selenium");
However there is one big disadvantage in using Absolute XPath locators. There is a high possibility of failure even if small changes are made to the reference elements. Due to this sole reason Absolute XPaths are seldom used.
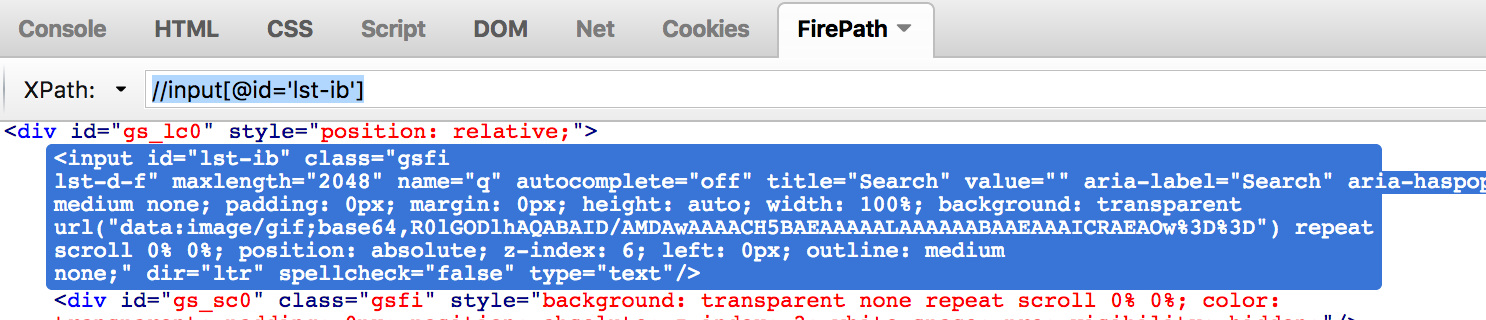
Relative XPath:
Relative XPath starts from the middle of the HTML DOM structure. Its start with the double forward slash (//), which means it can search the element anywhere at the web page. For example the same Google text box can have the Relative XPath as displayed below:
FirePath add on to find Relative XPath
The code for Relative XPath will be:
//Relative XPath for the text box
driver.findElement(By.xpath(".//*[@id='lst-ib']")).sendKeys("selenium");
As you can see Relative XPath does not uses the complete path, rather it starts in the middle of the web page. ‘.//*[@id=’lst-ib’]‘ means to search for the ID relative to the current node reference.
The same XPath code can be written in a much better way:
//Relative XPath for the text box
driver.findElement(By.xpath("//input[@id='lst-ib']")).sendKeys("selenium");
You can use any of the attributes of the element in this code but make sure to use ‘@‘ in front of the attribute. By replacing ‘*‘ with ‘input‘ tag, we are specifically instructing the driver to search for the ID in ‘input‘ tag only otherwise it will look for the ID in all tags.
Some more examples for identifying Google text box using Relative XPath:
XPath for Google text box
//Xpath of text box with Class attribute
driver.findElement(By.xpath("//input[@class='gsfi']")).sendKeys("selenium");

//Xpath of text box with Name attribute
driver.findElement(By.xpath("//input[@name='q']")).sendKeys("selenium");
Relative XPath using contains():
When the partial value of an attribute is dynamic, we can use contains() method in Relative XPath to locate the web element. The same code for identifying the Google text box can be written using contains() method:
//Xpath of text box with Class attribute using contains() method
driver.findElement(By.xpath("//input[contains(@class,'gsfi')]")).sendKeys("selenium");

//Xpath of text box with Name attribute using contains() method
driver.findElement(By.xpath("//input[contains(@name,'q')]")).sendKeys("selenium");
Please note that we need to be careful when using the contains() method as it will try to locate all elements which contains the value that we mentioned in the code.
We can also use the contains() method to locate an element using text.
XPath locator for Sign in
In the above screenshot of Yahoo web site, we can locate the text ‘Sign in’ using contains() method.
//XPath of Sign in button using contains() method
//Locating using text
driver.findElement(By.xpath("//a[contains(text(),'Sign')]"));
Relative XPath using starts-with():
Like contains() method, starts-with() method can be used for elements with dynamic values. The same code for locating the Sign in button in Yahoo web site can be written using starts-with() method:
//XPath of Sign in button using starts-with() method
//Locating using ID
driver.findElement(By.xpath("//a[starts-with(@id,'uh-sign')]"));
Similar to contains() method, starts-with() method can be used for other attributes and text(). The same code can be written locating the web element using text():
//XPath of Sign in button using starts-with() method
//Locating using text
driver.findElement(By.xpath("//a[starts-with(text(),'Sign')]"));
Relative XPath using OR & AND:
OR expression can be used when any one or all conditions are met. The same code for Sign in can be written as:
//XPath of Sign in button using OR conditions
driver.findElement(By.xpath("//a[@id='uh-signin' OR @class='xxx']"));
In the above case the driver successfully locates the Sign in button as one of the condition is met.
The same code fails when we use AND expression as there is no class attribute in anchor tag with value ‘xxx’
//XPath of Sign in button using AND conditions
//Code fails to locate the Sign in button
driver.findElement(By.xpath("//a[@id='uh-signin' AND @class='xxx']"));
Relative XPath using axes methods:
Sometimes when locating a web element becomes extremely difficult when they don’t have any fixed attributes. In that case we can use the help of different axes methods to navigate to correct element.
Following method can be best explained by this example:
XPath locator using following
In this example we are first locating ‘input‘ tag with ‘id=lst-ib’ and then using this as reference we will list out all ‘input‘ tags following the first located ‘input‘ tag. Always remember that following will list out all tags. However in this case you can locate a specific ‘input‘ by adding an index. Code sample for following:
//XPath Locator using following method
driver.findElement(By.xpath("//input[@id='lst-ib']/following::input[1]"));
Here we are first locating the ‘input‘ tag with ‘id=lst-ib’ and then using this ‘input‘ tag as reference, locate all other ‘input‘ tags in downward direction using following command. And then navigating to first ‘input‘ tag using ‘[1]‘ in our code.
2. Preceding works the same way. Only difference, instead of navigating in forward direction it travels in reverse direction. The code using Preceding can be written as:
//XPath Locator using preceding method
driver.findElement(By.xpath("//input[@id='gs_htif0']/preceding::input[1]"));
In the above example we are first locating the ‘input‘ tag with ‘id=gs_htif0’ and then using this ‘input‘ tag as reference, locate all ‘input‘ tags in upward direction using preceding command. And then navigating to first ‘input‘ tag using ‘[1]‘ in our code.
3. The ancestor axis selects all ancestors element (grandparent, parent, etc.) of the current node as displayed below:
XPath locator using ancestor
In the above example, we are first locating one child ‘div‘ tag using ‘id=mega-bottombar’ and then using it as reference, locate all the ‘div‘ ancestors for the ‘div‘ tag.
Code sample for the ancestor method:
//XPath using ancestor method
driver.findElement(By.xpath("//div[@id='mega-bottombar']/ancestor::div"));
4. The Child axis works similarly as ancestor method but in the opposite direction.
XPath using child
In the above example we are first locating the ancestor ‘div‘ with ‘id=mega-uh-wrapper’and then using it as a reference, list out all the child ‘div‘ tags. Code sample for this example:
//XPath using child method
driver.findElement(By.xpath("//div[@id='mega-uh-wrapper']/child::div"));
5. Following-sibling method is used to identify all the siblings at the same level of the current node.
XPath using following-sibling
In this example we are first locating the ‘div‘ element with ‘id=mega-topbar’ and then using it as reference, locate all other ‘div‘ tags which are siblings and are following to the located ‘div‘ tag. Code sample for this example:
//XPath using following-sibling method
driver.findElement(By.xpath("//div[@id='mega-topbar']/following-sibling::div"));
6. Preceding-sibling just works in the opposite direction of following-sibling. Instead of moving into forward direction, it moves in a reverse direction.
XPath using preceding-sibling
In this example we are first locating the ‘div‘ tag with ‘id=mega-bottombar’ and then using it as reference, locate all other ‘div‘ tags which are siblings and are preceding to the located ‘div‘. Code sample for this example:
//XPath using preceding-sibling method
driver.findElement(By.xpath("//div[@id='mega-bottombar']/preceding-sibling::div"));
7. Using parent method we can locate the parent of the current node.
In this example we are first locating the ‘div‘ tag with ‘id=mega-bottombar’ and then using it as reference, locate the parent ‘div‘ tag with ‘id=mega-uh-wrapper‘. Code sample for this example:
//XPath using parent method
driver.findElement(By.xpath("//div[@id='mega-bottombar']/parent::div"));
8. Using descendant method we can select all the descendants of the current node.
XPath locator using descendant
In this example we are first locating the ‘td‘ tag with ‘id=yui_3_18_0_4_1488151541532_940’ and then using it as reference, list out all the descendants having ‘input‘ tags. Code sample for this example:
//XPath using parent method
driver.findElement(By.xpath("//td[@id='yui_3_18_0_4_1488151541532_940']/descendant::input"));
With this we came to an end to the first part of Element Locators. Although the topic was lengthy, its also an important one. I would suggest to try out each of the Element Locator in Eclipse so that you can clearly understand the way Selenium identifies the elements in a web page.
Additional Note:
What is the difference between following and following-sibling?
The below two links will help you understand the difference between following and following-sibling.
Selenium scripts work with multiple browsers. In our first script we used Chrome browser and for executing the script in Chrome browser we had to set properties for Chrome Driver. In this post I will be mainly focusing on setting properties for other browsers. Before working with different browsers, make sure the browsers are installed on your machine. This is a prerequisite for executing the script in different browsers.
Safari:
Safari browser now provides native support for the WebDriver API. This means that you don’t have to download the Safari driver from third party section like we did for Chrome browser. Just change the System Properties as mentioned below and the scripts works just fine in Safari. You can copy the code from ‘FirstScript’ in ‘com.selenium.firstscript’ package and paste the script in a new class file ‘SecondScript’. Change the System properties and driver information as displayed below.
Safari Driver
Firefox:
With Selenium 3, for executing the scripts in Firefox browser, we will have to download the GeckoDriver. You can go to Selenium Website, go to Downloads, and then to ‘Third Party Drivers, Bindings, and Plugins’ section. Click the ‘Mozilla GeckoDriver’ link to go to download page.
Once you reach the GeckoDriver page, download the latest driver package based on your Windows/Mac OS to your local folder. Follow the same step for Chrome Browser download i.e. create a new folder ‘Firefox’ inside your root directory of the Java project that we created earlier. Copy the downloaded executable file into the ‘Firefox’ folder. Once done, create a new class file called ‘ThirdScript’ and copy paste the code from ‘FirstScript’ or ‘SecondScript’ file. Now we have to update the System properties and the driver information in the ‘ThirdScript.java’ file as mentioned below.
Firefox Driver
IE:
You need to download the MS Edge driver from the Selenium website and repeat the same steps of Chrome/Firefox browsers. The only difference is on the below code. Use these codes for IE browser:
System.setProperty("webdriver.ie.driver", "System.getProperty("user.dir") + "/IE/IEdriver"");
WebDriver driver = new InternetExplorerDriver();
Please note for Window OS, always use ‘\\’ instead of ‘/’ for setting the driver to correct location.
Note: When using MAC, to make the Driver executable, we have to run below command in Terminal where the driver is placed: chmod +x chromedriver
Now that we have set the System properties and created the driver object, the next task is to complete the remaining steps of our test case using the driver object.
I am attaching the complete code of our test case. I have added comments for each code for easy understanding.
Complete code for our Test Case
As we execute this script by clicking Run As -> Java Application, we will see the below message in our Eclipse console.
Test Case Passed
Additional Information:
What are System Properties?
The System class maintains a set of properties in key/value pairs that define traits or attributes of the current working environment. When the runtime system first starts up, the system properties are initialized to contain information about the runtime environment including information about the current user, the current version of the Java runtime, and even the character used to separate components of a filename. One of the example of the System Properties is “user.dir” that we used in the above program. “user.dir” refers to User’s current working directory and this property is already set in properties. Same way we are to manually set the System Property of Chrome browser “web driver.chrome.driver” which actually refers to the location of executable file.
What are element locators?
Selenium uses element locators to find the elements in the Web Page. In the above script, we used element locators like ID, LinkText etc to check if the element is present in the page. If the elements are present then we will be performing certain actions like ‘Click’ or ‘SendKeys’ using the driver object. If elements are not there or found then NoSuchElementException will be thrown and the script will fail. As we proceed further I will provide detailed explanation on different types of element locators and how to identify the correct locators while creating our scripts.
So far we wrote our first Selenium Script by creating a WebDriver object. Now by using this object we will navigate to a website and then perform various validations.
Our First Test Case:
Navigate to “Google” website using Chrome Browser. Find the Search Web Element, enter a text “Selenium” and then do a search. Click on the first link displayed and verify the title of the page after loading the web page. This is a manual test case that we will try to automate.
Let resume from our FirstScript.java that we created in last post. Add a new code “driver.get(http://www.google.com)” and save the script.
To execute the script, right click FirstScript.java and click Run As -> Java Application. The moment we execute this script, we get an exception in the IDE Console. The error says “The path to the driver executable must be set by the webdriver.chrome.driver system property”. This means that we have to inform the System or JVM the path of Chrome driver executable file by setting the system property.
Exception
Setting up System Property:
Windows OS/Mac OS:
To keep the script organized, you can create a new folder called “Chrome”inside our Java Project. This can be done easily by right clicking “FirstSeleniumProject” and then selecting New -> Folder.
Create a folder
Place the downloaded Chrome Driver Executable file (the one we downloaded in the last post) in this folder. We can do this by simply drag and drop from the Download folder. The above two steps can be avoided, however I did this just to make our script organized.
The next step is to set the System Properties for “webdriver.chrome.driver” with the location of the Chrome Driver executable file that we downloaded in the last post. Always remember, that this setting need to be done before assigning the WebDriver.
For Window OS – Add the following code for setting System Property for Chrome Driver
Code Snapshot for setting System Property for Chrome Driver
To make the driver object to navigate to a Google website, use the following code ‘driver.get(http://www.google.com)’. Always make sure to use the complete path of the URL including the http protocol.
Save the code and execute the script by clicking Run As -> Java Application or else you can also use the green play icon displayed in the header of Eclipse.
Click the green play button to execute the script
Once the execution starts, you will be able to see Google website opens in a new Chrome Browser window.
Google website opens in Chrome browser
And this completes the first step of our test case.
As you might be aware that Selenium is used for Test Automation for Web Applications. Selenium is composed of multiple software tools like Selenium IDE, Selenium WebDriver, Selenium Grid etc. We will be concentrating more on Selenium WebDriver as this is very powerful and commonly used for test automation. Selenium WebDriver is also compatible with multiple browsers like Google Chrome, Firefox, IE, Safari etc. I will also share details of Selenium Grid in upcoming posts which is mainly used for running scripts parallely in multiple environments.
Here I will be mainly focusing on creating our first Selenium script using JAVA language and by using Eclipse as our IDE. You can simply follow the step by step approach which I will be taking. They are very easy to follow…
First of all open Eclipse and select the default workspace as your working directory. You can change the location if required.
Go to File -> New -> Java Project to create a new Java Project. Enter the Project Name as “FirstSeleniumProject”. You can provide any name as your liking.
You can see by default the JRE environment is selected. In my case its Java SE 1.8
Click Next and Finish to complete the Java Project creation. This is very much same to our last “TestMadness” project creating.
Right Click on the “src” folder to create a new package. src -> New -> Package.
Enter the package name as “com.selenium.firstscript”. As mentioned earlier, package will create a folder heirarchy ‘com -> selenium -> firstscript’ and store the class file in it. Click Finish to complete the Package creating.
Right Click on the Package name and create a new class file. Package -> New -> Class.
Name the class as “FirstScript” and select the “public static void main(String[] args)” option. For simplicity we will be creating our first Selenium script inside the main method. When a program starts executing, it has to start execution from somewhere. That somewhere is called main method. Click Finish to complete the class creation.
This how FirstSeleniumProject looks like
Now that we have completed our Java Project creation, lets start creating creating our first Selenium Script inside the main method.
Enter the following code “WebDriver driver = new ChromeDriver()” in the main method as shown below. As you enter the code, you will see an error coming “- WebDriver cannot be resolved to a type”. Don’t worry on the error. This is because we haven’t added the Selenium Jars into our project. We will have to import the Selenium Jars into our project in order to work with Selenium.
Error in our first script
Next steps are to add the Selenium API into our Java Project.
Go to Download section of the Selenium.org website and download the Selenium Standalone Server as shown below.
Click 3.0.1 to download Selenium Standalone Server
Also download the Chrome Driver from ‘Third Party Drivers, Bindings, and Plugins’ in the same page. We will be executing our first Selenium script in the Chrome Browser. Chrome Driver is an executable file and it depends on the OS and configuration of the machine. Since I am working on a Mac 64 bit machine, I will be downloading the chromedriver_mac64.zip version.
Click Google Chrome Driver from Third Party Drivers sectionDownload the appropriate Driver version
Next step is to add the downloaded Jar file into our Java project.
Right Click the Java Project name “FirstSeleniumProjects” and select properties.
Select the Java Build Path in the Properties pop up.
Click on Add External Jars to import the downloaded Selenium Standalone Jar.
Go the correct location of the downloaded Selenium Standalone Jar and click OK to finish the import.
Selenium Standalone Server Jar import
Once the jar is imported, you can see Referenced Libraries is added in our project. Referenced Libraries contains the Selenium Standalone Server Jar that we imported.
Referenced Libraries
Now go to our “FirstScript.java” and click on the ‘WebDriver’ error as displayed. You can see a new option ‘import WebDriver’ is displayed. Click on this option to import all the required packages and classes for writing our first Selenium Script. Eclipse will do the import process. You can see a new code “import org.openqa.selenium.WebDriver” is added in our script.
Click import WebDriver
Similarly we can remove the ChromeDriver error by clicking on the error and importing the necessary packages for Chrome Driver. Both imports are from Selenium Standalone Server Jar that we imported into our project. Save the project and can see all the errors are removed now.
Error removed
Congrats! We started with our first Selenium script. Although this script is not validating anything but its great that we reached till this point. Please note to execute the Selenium script in Chrome browser, the browser need to be installed in your Windows or Mac machine.
I will continue with the scripting in the next blog. So stay tuned…
Additional Information:
What is a WebDriver?
As you have seen that in our first script we have used the command ‘WebDriver’. Many of you have wondered what WebDriver is actually. WebDriver is an Interface, and we are defining a reference variable (driver) whose type is an interface.Now any object we assign to it must be an instance of a class (For example ChromeDriver) that implements the interface.
Now obviously the next question comes, What’s an Interface?
Interface is OOPS concept. It is like a blueprint of Class. It contains variables and body less methods (Abstract methods), where we just declare methods but we implement them inside the class which inherit Interface. It always helps in understanding the Selenium script exercises if you have knowledge in OOPS concept.
What are different types of Drivers?
As mentioned, different Drivers contains the implementation of WebDriver Interface. Based on the browser requirement, we can use any of the following Drivers:
FirefoxDriver – For Firefox browser.
InternetExplorerDriver – For IE browser.
ChromeDriver – For Chrome browser.
SafariDriver – For Safari browser.
OperaDriver – For Opera browser.
AndroidDriver – For Android devices.
IPhoneDriver – For iPhone devices.
HtmlUnitDriver – For headless browser. This is a web-browser without a graphical user interface. It will behave just like a browser but will not show any GUI.
JAVA is a big topic and my intention here is not to teach JAVA. You can get loads of free materials from internet for learning JAVA. The last couple of posts were just to make you comfortable with the word JAVA and to give a high level idea on the IDE as we will be using both JAVA and IDE in all coming posts.
To work with Selenium, you need to have some understanding on any one of the Object Oriented Programming languages like JAVA, Python, C# etc.. I chose JAVA because JAVA is freely available and you can get lot of tutorial contents and support. Learning the concepts of JAVA is not a big task and I can assure you that to learn a programming language does not require too many skills. It just requires your patience and a desire to learn.
Here I will just list out the topics in Core JAVA that you need to know before comfortably working in Selenium:
OOPs Concepts:
Polymorphism
Inheritance
Abstraction
Encapsulation
Aggregation
Composition
Association
JAVA Topics:
Datatypes
Literals
Variables
Operators
Control Statements
Classes
Methods
Methods Overiding, Overloading
Class Inheritance
Interfaces, Packages and Access Control
Exceptions
Strings
Collections Framework
JAVA topics doesn’t end here but I think knowledge on the above topics will help you to get started with Selenium Automation.
Before going into details, let me give you a brief idea on Integrated Development Environment or IDE. IDE is a software application that has all the basic tools developers need to write and test software. Typically it contains a code editor, a compiler or interpreter and a debugger that the developer accesses through a single graphical user interface or GUI. Eclipse and NetBeans are the popular IDEs that most JAVA developers use and they are free to download. IDEs have lots of features that makes a developers life easy…
I will be using Eclipse as I am familiar with this IDE.
Download Eclipse:
Open Browser and navigate to Google. Type in “Eclipse download” and go to downloads page in eclipse.org website. Select the latest version for Java Enterprise Edition (EE) and download. You have to select correct version based on your Windows or Mac machine. Once download is complete in your local machine, you need to click on eclipse executable file. This will open the Eclipse IDE and a Eclipse Launcher prompt will come asking to confirm on the directory for Workspace. You can either go with the default location or else you can provide your own location. Workspace is where all your source code will be placed.
Click Ok to open up the main window. The steps are pretty much same for Windows and Mac machine.
Writing a simple program in Eclipse:
Now the Eclipse download is complete, lets write our first HelloWorld! program using Java as our programming language and Eclipse as our IDE.
Open Eclipse and go to File -> New and select Project option.
Select “Java Project” from the wizard and click on Next.
Enter Project name as “TestMadness”. You can give your own name to your project.
You can see the the default location of your project. Click on Next and then Finish to complete the project creation.
By default JAVA Project will have “src” folder which will contain your source code and “JRE System Library” folder which is added by Eclipse IDE automatically on creating Java Projects. JRE System Library implements the JAVA API in Eclipse IDE. So all the predefined functions of Java can be accessed by the Java Programs written in Eclipse IDE because of this JRE System Library.
Right click “src” folder and click New -> Package. Enter the package name as “com.selenium.testmadness” and click Finish to create a new package. A package in JAVA can be defined as a grouping of related types like classes, interfaces, enumerations and annotations and providing them access protection and namespace management. Here in this case, folder structure will be created in the form of com -> selenium -> test madness.
Once a package is created, our next task is to create a class file. Right click on the package and click New -> Class. Enter the class name as “HelloWorld” and select the option “public static void main(String[] args)” and click on Finish to complete JAVA Class creation.
If you directly go to Workspace location in your machine, you can see a folder structure is automatically created as TestMadness -> src -> com -> selenium ->test madness -> HelloWorld.java.
For writing a simple HelloWorld program, add “System.out.println(“HelloWorld!”)” in the public static void main method as shown below. This is a simple program to print “HelloWorld!” in the IDE console.
To execute the HelloWorld program, right click HelloWorld.java class file and click run as Java Application. You can see the “HelloWorld!” printed in the console.
Additional Notes:
What is public static void main(String[] args) method?
main method in Java is an standard method which is used by JVM to start execution of any Java program. It is the entry point for core JAVA applications. However you can compile a core JAVA application without a main method. main method is always public that is anyone can see or run it. static means that you can call the function without an instance of the class. void means that the method has no return type. String[] args is an array of command-line arguements and the only formal parameter to the method. Here in our case we are not passing any command line arguments. System.out.println command prints “HelloWorld!” on the screen and then adding a new line after it.
Now that JDK is installed and Environment Variables are set up in our machine, lets try to create and execute a simple “HelloWorld” program using Command Prompt or Terminal.
Using a text editor like Notepad or TextEdit write a simple program and then save the file as “HelloWorld” with .java extension. You can save it in any location.
HelloWorld in text editor
Open your Command Prompt or Terminal and go to the location where your .java file is saved.
Type in “javac -d . HelloWorld.java” in the Command Prompt or Terminal. Here “javac” refers to JAVA Compile command. As you remember in our previous post, we set our PATH to JDK Bin in our machine. Bin folder contains the executable files for “javac” and “java” commands. “-d” refers to Directory where “.class” files will be stored. When we run “javac” command, the javac compiler compiles your .java source files into .class files, and so that JavaVM can execute (interpret) those files. “.” refers to current working directory and “HelloWorld.java” is the file that we just created.
As you see we created a package “com.selenium.test” in our first JAVA program. What is a package? I know many will have this question. A package in JAVA can be defined as a grouping of related types like classes, interfaces, enumerations and annotations and providing them access protection and namespace management. In simple terms, it will store the source file inside a folder structure. Here in this case, folder structure will be created in the form of com -> selenium -> test. When we run this command, system will automatically create a folder structure com -> selenium -> test and store the “.class” file inside the “test” folder.
com folder is created inside HelloWorld folder
Once the compilation is complete, next step is to execute the “.class” file. Type in “java com.selenium.test.HelloWorld” in the Command Prompt or Terminal and hit Enter. This time we don’t have to use the file extension. And as you see below, the execution is success.
Hello World!
If we are not using any package is our program, then we can simply go to our source folder and run the below commands.
Additional Notes:
Command Prompt is Windows based DOS application and Terminal is Mac Os based Linux application. The purpose is same but the commands are bit different. You can get a complete list of required commands for both Windows and Mac machine from below URL:
Once the JDK installation is complete, the next big step is setting the Environment Variables in your machine. Environment Variables setting is different for Windows and Mac machines. I will walk you through in setting up the Environment Variables in both machines.
Before setting up the Environment Variables, let me give you a basic idea on what are Environment Variables?
Environment variables are, in short, variables that describe the environment in which programs run in.Examples of environment variables in an operating system include PATH, HOME etc.
To execute JAVA console based programs in Windows or Mac environment we have to use javac and java commands. These commands are unknown for Windows or Mac till we do not specify explicitly where those executable resides. This is the reason while setting the PATH we specify path of bin folder(bin contains all the binary executable).
Mac OS:
Open Terminal in Mac OS similar to command prompt in Window
Type in the following command “vim .bash_profile”. This will open the VIM editor in terminal. bash_profile is a configuration file for bash shell. When .bash_profile is invoked as an interactive login shell it first reads and executes commands from ~/.bash_profile. This file can be used to export variables in shell.
Type ‘i’ to insert into the VIM Editor.
Type in “export JAVA_HOME=$(/usr/libexec/java_home)” to set up JAVA_HOME.
Type in “export PATH=${JAVA_HOME}/bin:$PATH” to set up PATH.
To Save the entires in VIM Editor, hit Escape, type in: “:wq + Enter”. To Quit without saving the editor, hit Escape, type in “:q!”.
Type in “source .bash_profile”. This command will save the entries in .bash_profile.
Type in “echo $JAVA_HOME” to verify JAVA_HOME Environment Variable.
Type in “echo $PATH” to verify PATH Environment Variable.
VIM Editor in Mac
Please ignore M2_HOME as of now. This is for setting up the MAVEN Home which I will explain in future blogs.
Windows OS:
Type “advanced system settings” in the search box (beside the Windows start button), clicks View advanced system settings.
Select Advance tab, clicks Environment Variables.
In System variables, add a new “JAVA_HOME” variable and point it to the JDK installed folder which by default is “C:\Program Files\Java\jdk1.8.0_111”.
In System variables, find “PATH”, clicks edit and append this “%JAVA_HOME%\bin” to the end.
Type in “echo %JAVA_HOME%” to verify JAVA_HOME Environment Variable.
Type in “echo %PATH%” to verify PATH Environment Variable.
Environment Variable Setting in Windows 1o
Now that we have completed the Environment Variable settings in our machine, we can move on to the next topic…
Please note that you need to be an Admin in your machine or else you won’t have the privilege to set the Environment Variables.