
For Cucumber Framework Development, we will reuse some of the steps and codes from our previous Hybrid Framework Development….
- The best approach is to clone the project from GitHub. Details will be provided at the end of this post. Although we will be using most of the codes from Part 1: Hybrid Framework Development…, there will be some changes in order to accommodate the Cucumber framework. The first change is in the
pom.xmlfile. As mentioned below, we will have to add additional dependencies for supporting Cucumber framework.<!-- https://mvnrepository.com/artifact/info.cukes/cucumber-java --> <dependency> <groupId>info.cukes</groupId> <artifactId>cucumber-java</artifactId> <version>1.2.5</version> </dependency> <!-- https://mvnrepository.com/artifact/info.cukes/cucumber-junit --> <dependency> <groupId>info.cukes</groupId> <artifactId>cucumber-junit</artifactId> <version>1.2.5</version> </dependency> <!-- https://mvnrepository.com/artifact/info.cukes/cucumber-picocontainer --> <dependency> <groupId>info.cukes</groupId> <artifactId>cucumber-picocontainer</artifactId> <version>1.2.5</version> <scope>test</scope> </dependency>
- Our next step is to install the Cucumber plugin into Eclipse. This plugin provides a lot of support in creating feature files. To install click Help -> Eclipse Marketplace in Eclipse. Type in ‘Cucumber’ to search for the plugin and then click install to complete the installation. Eclipse restart will be required.

Eclipse Marketplace - Next step is to create some source folders for the resources. Maven by default will create a resource source folder for the main when we use ‘properties-maven-plugin’ in our
pom.xml. We need to create one more for the test. To create a source folder under test, right click ‘src/test/java’ folder -> Build Path -> Configure Build Path -> Add Folder. Name the folder as ‘src/test/resources’. - Once the resources folders are created, our Project Structure will look as below. Notice we have four source folders.
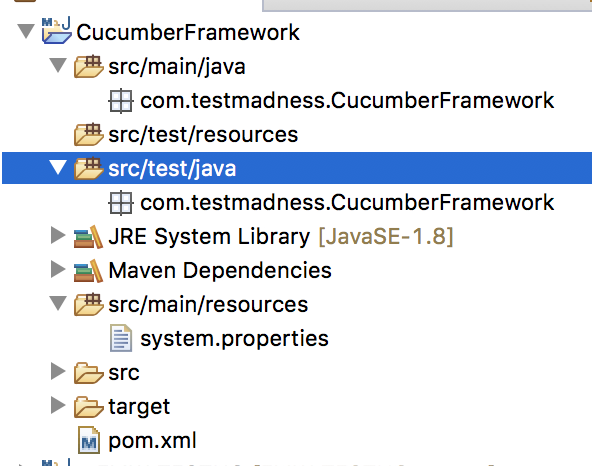
Project Structure after adding resource folders. - The above folder structure will help us to manage our source files. For example, ‘src/main/java‘ folder will contain all our page object-related and utility source files, ‘src/test/java‘ folder will contain our step definitions, runner and hook, and ‘src/main/resources‘ will contain properties files and ‘src/test/resources‘ folder will contain our Cucumber feature files.
- To create a feature file, right click ‘src/test/resources‘ folder and click New -> Other. Select File inside General. Click Next and name the file as ‘TC001_FindFlights.feature’. Notice ‘.feature‘ will be the extension of our feature file.

Create Feature file - Our next task is to create a test case using Gherkins language. For now, we will create a simple test case where a user navigates to New Tours Demo website, enters username and password, click the login button and verifies the ‘Flight Finder page’. When we write our test case in Gherkins, we have to make sure that we have a Feature and a Scenario or Scenario Outline as displayed below. We will discuss more on the difference between Scenario and Scenario Outline.

Feature file - Our next task is to create a Cucumber Runner class. Cucumber uses JUnit framework to execute the code. This class will use @RunWith() annotation which tells JUnit to start the execution of our tests. This is very much similar to Java main method.
- To create a Runner Class, create a package ‘com.testmadness.runner’ and inside that create a new Class named ‘DemoTest’. Notice that we need to use ‘Test’ in our class name so that Maven can execute the Runner class. Copy below code in our Runner class. This Class doesn’t require any code, it just requires annotations to execute and find locations of feature files and step definition classes.
import org.junit.runner.RunWith;
import cucumber.api.CucumberOptions;
import cucumber.api.junit.Cucumber;

@RunWith(Cucumber.class)
@CucumberOptions(plugin = {"pretty", "html:target/cucumber"},
features = "src/test/resources/", glue = {"com.testmadness.stepdefinition", "com.testmadness.hooks"}, tags = "@TC002")
public class DemoTest {

}
Runner class - Next task is to create corresponding codes for each line of ‘Given’, ‘When’, ‘Then’ and ‘And’ statements. We can create the structure of the code by doing a test run. Right-click the Runner class ‘DemoTest’ and select Run As -> 2 JUnit Test. Once the execution is complete, we can view the code structure as displayed below in the console.

Step Definition - Next step is to place the above method in a Step Definition class. Right-click ‘src/test/java’ folder and create a new package ‘com.testmadness.stepdefinition’. Inside this package, we will create a new class named ‘Home_Step’. There is no need to create separate classes for placing step definition methods but since we are following a page object model approach in our framework, it’s better to separate step definition methods for different pages.

Step Definition class for Home Page - Notice that the step definition class has a constructor where we are creating an object of ‘HomePage’ class. The ‘HomePage’ class will have page related element locators as well as page related specific methods. This separation makes the code more readable and easy for maintenance.
- Our next task is to create a Hook class. Cucumber Hooks allow us to reduce code redundancy. For example, repeating steps like opening and closing of a browser can be written inside @Before and @After methods. A @Before method will run before the first step of each scenario and a @After method will run after the last step of a scenario. Apart from these two, there are other methods also like the @AfterStep which can be used to execute after every step.

Hook class -
Notice that in the above Hook class, Log4j, Extent Reports, and Web Driver are initialized in the @Before method whereas codes for closing Web Driver and taking screenshots are placed in the @After method.

Project Structure - We can execute our Cucumber scripts in two ways – Right-click Cucumber Framework and select Run As -> Maven test or else Right-click the Runner class ‘DemoTest’ and select Run As -> JUnit Test.

Run as Maven Test 
Run as JUnit Test - The reporting in this framework is same as of our last framework Hybrid Framework Development…. We have used both Extent and Log4j reports.

Extent Report 
Extent Reports and Log4j Reports
The complete project is available on GitHub.
https://github.com/autotestmadness/CucumberFramework…
With this, we have completed our Cucumber Framework development. Please feel free to comment and share your thoughts. More topics to follow, until then Happy Learning!